Preparing your kitchen for a food photography shoot involves cleaning, organizing, gathering props, planning lighting, and coordinating with your photographer. A well‑prepared kitchen saves time, reduces stress, and results in professional images that can increase menu item sales by up to 30% (see our article on the ROI of professional food photography). This step‑by‑step guide walks Perth restaurant and café owners through each preparation task to ensure your venue gets stunning, sales‑driving photos.
Whether you’re shooting for a new menu, updating your website, or creating content for social media, the effort you put into preparation directly impacts the quality of your final images. In Perth’s competitive hospitality scene—from Northbridge to Fremantle, the CBD to suburban Subiaco—where visuals often decide a customer’s first impression, getting this right is crucial.
Kitchen Preparation Timeline
Use this timeline to ensure everything is ready without last-minute stress:
| Timing | Task | Details |
|---|---|---|
| 2 weeks before | Finalise shot list | Decide which dishes to photograph; confirm with photographer |
| 1 week before | Gather props | Collect plates, linens, boards, garnishes; buy or borrow missing items |
| 48 hours before | Deep clean kitchen | Degrease surfaces, clean windows, polish reflective surfaces |
| 24 hours before | Prep non-perishables | Set up styling station; test lighting; organise props by dish |
| Morning of | Prep ingredients | Wash herbs, prep garnishes, portion ingredients; final surface wipe |
| 1 hour before | Final check | Clear walkways, turn off overhead lights, brief team on schedule |
Step 1 – Clean and Declutter Your Workspace
A clean kitchen isn’t just about hygiene—it’s about creating a neutral canvas that lets your food be the star. Before the photographer arrives, take time to:
- Clear countertops of all non‑essential equipment, utensils, and personal items.
- Wipe down surfaces to remove grease, water spots, and fingerprints that can show up in reflections.
- Hide trash bins, cleaning supplies, and storage containers out of frame.
- Check the floor for spills or debris that could appear in wide‑angle shots.
- Clean windows from the inside—dust and smudges affect natural light quality.
- Polish stainless steel to remove streaks and fingerprints that cameras magnify.
Remember: the camera sees everything. A cluttered background distracts from your dishes and can make your kitchen look unprofessional. For Perth venues, where natural light often highlights dust and smudges, a thorough clean is especially important.
Cleaning Checklist for Perth Venues
| Area | Action | Why It Matters |
|---|---|---|
| Countertops | Degrease, polish, remove all items | Primary shooting surface; must be spotless |
| Windows | Clean inside and outside if accessible | Dirty glass reduces light quality |
| Stainless steel | Polish with appropriate cleaner | Fingerprints and streaks are magnified |
| Floors | Mop, remove mats if distracting | Visible in wide-angle and low shots |
| Shelving/background | Declutter, arrange intentionally | Adds context but shouldn’t distract |
| Dishware | Inspect for chips, stains, watermarks | Hero plates must be perfect |
Step 2 – Gather Your Props and Styling Tools
Professional food photography relies on props to add context and visual interest. Gather these items ahead of time to avoid last‑minute scrambling:
- Plates, bowls, and servingware in various sizes and styles that match your brand.
- Cutlery, napkins, and glassware that are spotless and free of watermarks.
- Textured linens, wooden boards, or stone slabs to create different backgrounds.
- Fresh herbs, citrus wedges, spices, and other garnishes that can be added during the shoot.
- Small tools like tweezers, brushes, and spray bottles for precise styling.
- Backup ingredients for key dishes in case of plating mishaps.
Props Checklist by Venue Type
| Venue Type | Suggested Props | Avoid |
|---|---|---|
| Coastal café (Fremantle, Scarborough) | Light wood, white linen, shells, natural textures | Dark/industrial elements |
| Fine dining (CBD, Subiaco) | Matte black, slate, white plates, minimal styling | Busy patterns, casual props |
| Industrial bar (Northbridge) | Dark wood, metal, concrete, moody textures | Light/airy styling |
| Brunch spot (Mount Lawley) | Colourful plates, fresh flowers, marble, terrazzo | Dark/moody styling |
| Asian restaurant | Ceramic dishes, chopsticks, bamboo, tea sets | Western-style props |
| Italian trattoria | Rustic wood, checked linen, olive oil, fresh pasta | Modern minimalist styling |
If you’re unsure which props suit your venue’s style, look at Perth food photography trends: coastal cafés often use light, natural materials, while city bars might lean toward dark, industrial textures. Your photographer can also advise on what works best for your dishes. For more styling ideas, see our food photography tips for restaurants.
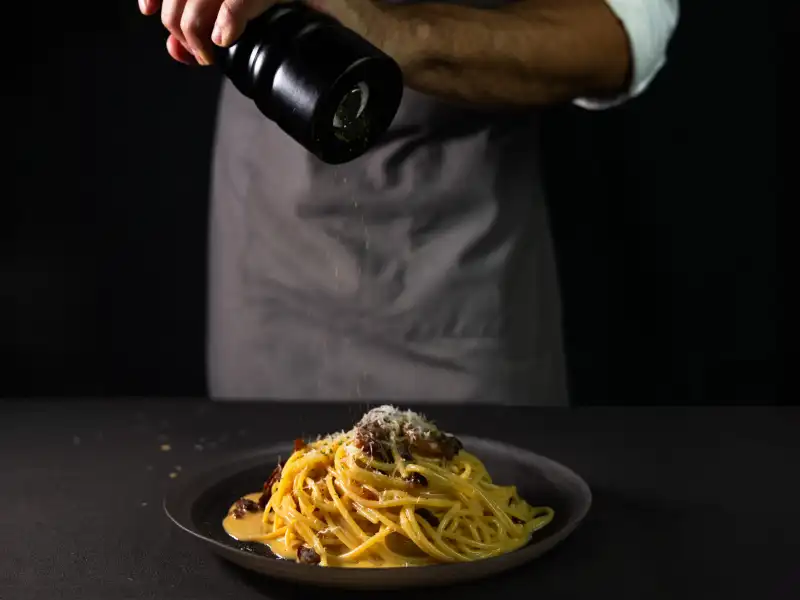
Step 3 – Plan Your Lighting Setup
Lighting is the single most important factor in food photography. Perth’s abundant natural light is a huge advantage, but you need to plan how to use it:
- Identify the best window in your kitchen—ideally one that provides soft, indirect light for most of the day.
- Avoid direct sunlight, which creates harsh shadows and blown‑out highlights. Use sheer curtains or diffusers if needed.
- Have backup lighting ready for evening shoots or cloudy days. Continuous LED panels or softboxes can mimic natural light.
- Turn off overhead fluorescent lights, which cast unflattering yellow or green tones on food.
- Schedule around the sun—morning light (8–10am) and late afternoon (3–5pm) are often ideal in Perth.
Perth Lighting Conditions by Time
| Time | Light Quality | Best For | Cautions |
|---|---|---|---|
| 6–8am | Soft, warm, golden hour | Breakfast dishes, café ambiance | May be too dim indoors |
| 8–10am | Bright but soft | General food photography | Ideal window |
| 10am–2pm | Harsh overhead sun | Artificial lighting only | Strong shadows, hot spots |
| 2–5pm | Softening, warm | Afternoon dishes, venue atmosphere | Watch for shifting sun angle |
| 5–7pm (summer) | Golden hour, warm | Outdoor shots, sunset ambiance | Limited window; work fast |
Discuss lighting with your photographer beforehand. They may bring additional equipment, but knowing your kitchen’s light conditions helps them plan the shoot efficiently. For more on lighting, read our article on natural vs artificial light for Perth cafés.
Step 4 – Organize Your Dishes and Ingredients
A well‑organized shoot flows smoothly and keeps food looking fresh. Create a shot list and sequence dishes logically:
- Group similar dishes (e.g., all pasta, all seafood) to reuse styling and lighting setups.
- Start with cold or room‑temperature dishes that won’t wilt or melt under lights.
- Prepare ingredients in stages so everything is at peak freshness when it’s time to shoot.
- Keep a “hero” version of each dish reserved solely for photography—untouched by tasting or serving.
- Have backup components ready for items that wilt quickly (greens, sauces, ice cream).
Dish Sequencing for Maximum Freshness
| Shoot Order | Dish Type | Reason |
|---|---|---|
| First | Charcuterie, salads, cold appetisers | Won’t degrade under lights |
| Second | Sandwiches, sushi, room-temp dishes | Stable for longer |
| Third | Desserts (non-frozen) | Stable but can melt |
| Fourth | Cooked mains, pasta, grilled items | Need to capture steam/freshness quickly |
| Last | Ice cream, frozen desserts, drinks with ice | Melt within minutes; shoot immediately |
For Perth venues, consider seasonal produce availability. Shooting in summer? Highlight local stone fruit, seafood, and salads. In winter, focus on hearty stews, roasted vegetables, and warm desserts. Seasonal WA ingredients not only look fresh—they also resonate with local customers who recognise regional produce.
Perth Seasonal Produce Calendar
| Season | Peak Produce | Styling Opportunity |
|---|---|---|
| Summer (Dec–Feb) | Stone fruit, berries, seafood, salads | Fresh, bright, colourful styling |
| Autumn (Mar–May) | Apples, figs, pumpkin, mushrooms | Warm earth tones, rustic presentation |
| Winter (Jun–Aug) | Citrus, root vegetables, WA truffles | Cozy, moody, comfort food styling |
| Spring (Sep–Nov) | Asparagus, peas, lamb, wildflowers | Light, fresh, awakening styling |
Step 5 – Coordinate with Your Photographer
Clear communication with your photographer ensures everyone is on the same page. Share these details before the shoot:
- Your shot list and any must‑have images (e.g., signature dishes, new menu items).
- Your brand style guide or examples of images you like (and don’t like).
- Access and parking information for your venue, especially in busy Perth suburbs like Northbridge or Fremantle.
- Contact numbers for the day, plus any kitchen safety or protocol reminders.
- Intended use for the images—website menu, social media, Google Business Profile, print materials—so they can tailor framing and resolution.
Pre-Shoot Communication Checklist
| Item | Share With Photographer | Why It Matters |
|---|---|---|
| Shot list | Prioritised list of dishes | Ensures must-haves are captured first |
| Brand guidelines | Colours, fonts, mood references | Images match your overall brand |
| Reference images | Examples of what you like/dislike | Aligns expectations |
| Image use | Website, social, print, Google | Affects framing and resolution needs |
| Venue access | Parking, loading, security codes | Smooth equipment setup |
| Key contacts | Chef, manager on duty | Quick decisions during shoot |
A good photographer will also ask about your goals for the images—website menu, social media, print materials—so they can tailor the shoot accordingly. At Amplify Creative Lab, we combine food photography with web development expertise, meaning we also consider how the images will perform online (loading speed, mobile responsiveness, SEO). Learn more about why image optimisation matters and why fast websites get more bookings in Perth.
Perth‑Specific Considerations
Perth’s hospitality scene has unique characteristics that can influence your shoot preparation:
- Coastal venues (Fremantle, Scarborough, Cottesloe) often benefit from bright, airy styling that matches their beachside location and abundant natural light.
- City restaurants (Perth CBD, Northbridge) might prefer darker, moodier lighting to suit an industrial or fine‑dining atmosphere.
- Seasonal changes are more pronounced in WA—plan shoots around local produce peaks for authentic, appealing imagery.
- Local regulations regarding photography in commercial kitchens (e.g., food‑safety certifications) should be checked beforehand.
- Venue parking in busy areas like Northbridge or Fremantle may require advance arrangement for equipment loading.
Frequently Asked Questions: Food Shoot Preparation
Your Kitchen Ready, Your Images Stunning
A successful food shoot is the result of careful preparation. By cleaning your space, gathering props, planning lighting, organizing dishes, and coordinating with your photographer, you create the ideal conditions for capturing images that truly represent your food and your brand.
In a market where customers decide where to eat based on visuals—whether they’re scrolling Northbridge options on a Friday night or comparing Fremantle brunch spots—investing time in kitchen preparation pays off with higher‑quality photos that drive engagement, increase orders, and strengthen your online presence across your website, Instagram, Google Business Profile, and delivery platforms.
Ready to Capture Your Menu in Its Best Light?
At Amplify Creative Lab, we specialize in food photography for Perth hospitality venues. We understand the local scene, the importance of preparation, and how to create images that look beautiful and load fast on your website.
Want stress‑free, professional results? Book a half‑day food photography shoot with us and we’ll handle everything from pre‑shoot planning to final optimized images. Tell us about your venue, and we’ll send a tailored quote to get your kitchen shoot‑ready.
Related reading: Learn about photography mistakes costing you customers, discover the ROI of professional food photography, and see how to use food photography across all your platforms.