Not every photo needs to come from a professional shoot. Between quarterly sessions with a photographer, your restaurant, cafe, or venue still needs fresh images — daily specials, new dishes, behind-the-scenes content, stories, and Google Business Profile updates.
Your phone can handle that. Here is how to get the most out of it.
1. Find the Light (This Is the Only Rule That Matters)
The single biggest difference between a phone photo that looks professional and one that looks like a snapshot is light.
Use Natural Light
Move the dish to the nearest window. Natural daylight — ideally soft, indirect light on an overcast day or from a north-facing window — is the most flattering light for food. It reveals texture, creates gentle shadows, and keeps colours accurate.
Avoid Direct Sunlight
Harsh midday sun through a window creates hard shadows and blown-out highlights. If the light is too strong, diffuse it with a sheer curtain, a sheet of baking paper taped to the window, or simply wait for a cloud.
Never Use the Flash
The built-in phone flash fires directly from the front, flattening everything. Food looks pale, shiny, and unappetising under flash. If the venue is too dark for natural light, move the dish or wait until daylight hours. There is no fixing bad flash light in editing.
Bounce Light from the Opposite Side
If one side of the dish is in shadow, hold a white napkin, plate, or piece of card on the opposite side to bounce light back into the shadows. This is a free, instant fill light that professionals use constantly.
2. Choose Your Angle
Two angles work for almost every dish:
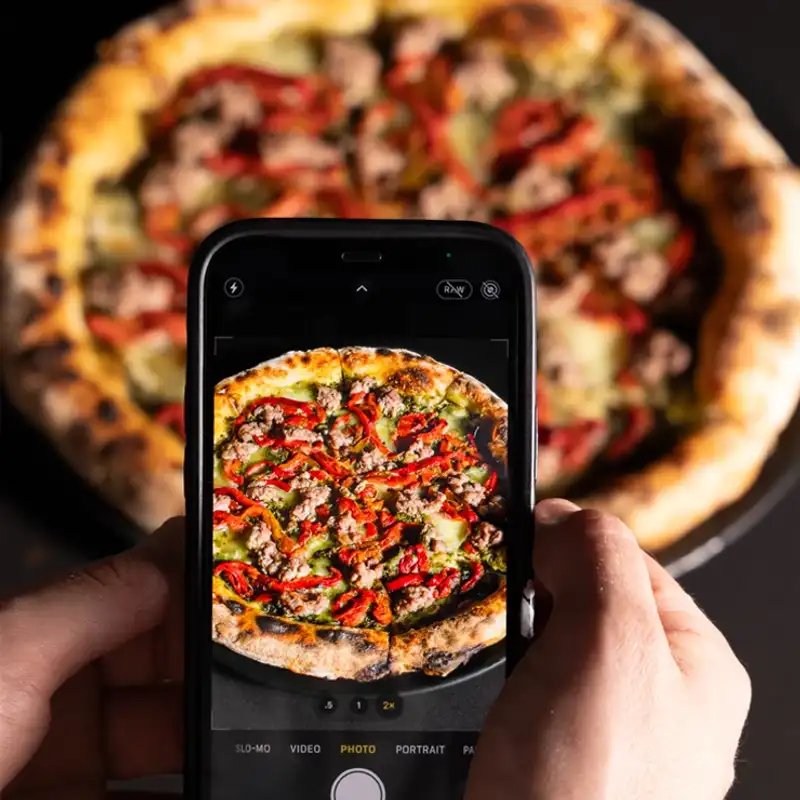
Overhead (Top-Down)
Best for: flat lays, pizzas, bowls, platters, table spreads, anything arranged in a pattern.
Hold your phone directly above the dish, parallel to the table. Most phones have a grid overlay and a level indicator — use them. Even a slight tilt creates an awkward distortion that is hard to fix.
45-Degree Angle
Best for: burgers, stacked dishes, drinks, anything with height or layers you want to show.
Hold your phone at roughly 45 degrees — halfway between overhead and eye level. This is the natural angle a diner sees the food from and feels intuitive in photos.
What to Avoid
Shooting from directly in front at table height rarely works for food. It compresses the dish, hides the contents, and usually includes too much background clutter.
3. Clean and Simplify
Before you take the photo:
- Wipe the plate rim. Sauce drips and fingerprints are invisible in person and glaring in photos.
- Straighten the garnish. One wilting herb leaf ruins the shot.
- Clear the background. Move condiment bottles, napkin dispensers, menus, and clutter out of the frame. A clean background makes the food the focus.
- Use a simple surface. A wooden table, marble counter, or clean white plate reads much better than a busy patterned tablecloth.
You do not need to be a food stylist — just tidy the scene.
4. Camera Settings That Help
Lock Focus and Exposure
Tap and hold on the dish in your camera app. This locks focus and exposure so the camera does not re-adjust while you frame the shot. On iPhone, this activates “AE/AF Lock”. On Android, the behaviour is similar.
Use the 1x Lens
Avoid zooming in — digital zoom degrades quality. Use the standard 1x wide lens and move your body closer or further away. If your phone has a 2x optical zoom (iPhone Pro, Samsung Ultra), that lens can also work well for tighter crops without distortion.
Turn on the Grid
Enable the rule-of-thirds grid in your camera settings. Place the dish at one of the intersection points rather than dead centre for a more balanced composition.
Shoot in the Highest Quality
Make sure your phone is set to capture at full resolution. On iPhone, avoid HEIF if you plan to upload to platforms that prefer JPEG — or just export as JPEG from Photos.
5. Composition Basics
One Subject Per Photo
If you are photographing a single dish, make it the clear hero of the frame. Do not try to fit three dishes, a drink, and the restaurant sign into one shot.
Leave Breathing Room
Do not crop so tight that the plate edges are cut off. Leave some negative space around the dish — it gives the image room to breathe and works better for social media cropping.
Use Props Sparingly
A fork, a glass of wine, or a hand reaching in can add life to a food photo. But too many props create clutter. One or two supporting elements is enough.
Show Context When It Helps
For Instagram Stories or Google Business Profile posts, showing a bit of the venue — the table, the window, the bar in the background — adds personality and helps potential customers picture themselves there.
6. Editing on Your Phone
You do not need Photoshop. The built-in photo editor on iPhone or Google Photos handles the essentials:
The Three Adjustments You Need
- Brightness/Exposure — lift slightly if the image is too dark
- Contrast — a small boost (10–15%) adds depth and makes colours pop
- Warmth/Temperature — pull slightly cooler if the image looks too orange from indoor lighting
What to Skip
- Heavy filters that change the colour palette
- Over-saturation that makes food look neon
- Vignettes (dark corners) that look dated
- Heavy sharpening that creates halos around edges
Crop to Platform
If the image is for Instagram feed, crop to 4:5 (portrait) or 1:1 (square). For Instagram Stories, crop to 9:16. For Uber Eats, check the platform’s image requirements — most want square or landscape. For your website, landscape (16:9 or 3:2) usually works best.
7. When to Use Your Phone vs Hire a Professional
Your phone is the right tool for:
- Daily social media — stories, reels, specials of the day
- Behind-the-scenes content — kitchen action, prep, team moments
- Quick Google Business Profile updates — new dish photos, seasonal changes
- Testing dish presentation — checking how a dish looks before a professional shoot
A professional photographer is the right choice for:
- Menu launch images — the 10–20 hero shots that represent your brand
- Website photography — hero banners, gallery images, about page portraits
- Printed menus and collateral — anything that will be reproduced at high resolution
- Delivery platform listings — Uber Eats, DoorDash, and Deliveroo images that need consistency across 15+ dishes
- Advertising and campaigns — social ads, Google Ads, and print ads where image quality directly impacts conversion
The best approach is both: professional shoots for your core brand imagery, and phone photos for the daily content in between.
Quick Reference: Phone Food Photography Checklist
- Move dish to the best light (window, outdoors, or bright area)
- Turn off flash
- Wipe plate rim and straighten garnish
- Clear background clutter
- Choose angle: overhead or 45 degrees
- Tap to lock focus on the dish
- Enable grid overlay
- Take 3–5 shots with slight variations
- Edit lightly: brightness, contrast, warmth
- Crop to platform dimensions before posting
Want professional food photography for your core menu and brand images? Amplify Creative Lab shoots across Perth for restaurants, cafes, and hospitality venues. See our packages or book a session.